Posts

Showing posts from October, 2020

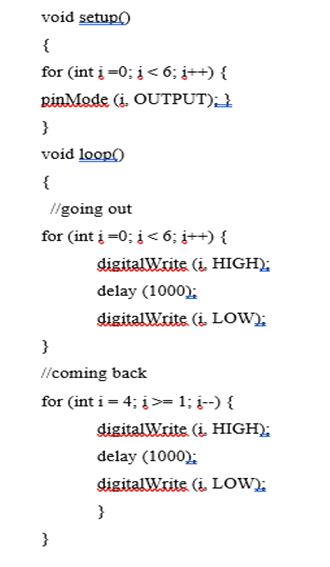
Larson Scanner

Image
 Larson Scanner

Ultra Sonic Sensor

 Ultra Sonic Sensor Code int trigPin = 12; /* Trig pin of the sensor is connected to the 6th pin of Arduino */ int echoPin = 11;  /* The echo pin of the sensor is connected to the 7th Pin of the Arduino */ long Duration; //Duration   long Distance; //Distance   int leftMotor_1=3;  //motor 1 the first data entry is HIGH OR LOW int leftMotor_2=2;  //motor 1 the second data entry is HIGH OR LOW int rightMotor_1=4; //motor 2 the first data entry is HIGH OR LOW int rightMotor_2=5; //motor 2 the second data entry is HIGH OR LOW int leftMotor_pwm=6;  // motor 1 Speed ​​control is done with pwm input for                       // 0-255 analog PWM signal is sent in range int rightMotor_pwm=9; // motor 2 Speed ​​control is done with pwm input for                        // 0-255 analog PWM signal is sent in range void setup() {   for(in...

IR Car Remote

 IR Car Remote Code #include <IRremote.h> int RECV_PIN = 11; IRrecv myIrrecv(RECV_PIN); decode_results results; //Init Motors const int PWM_M1 = 5; const int IN1_M1 = 2; const int IN2_M1 = 3; const int PWM_M2 = 6; const int IN1_M2 = 8; const int IN2_M2 = 9; int speed = 100; void setup(){   Serial.begin(9600);   myIrrecv.enableIRIn();      pinMode(PWM_M1,OUTPUT);   pinMode(PWM_M2,OUTPUT);      pinMode(IN1_M1,OUTPUT);   pinMode(IN2_M1,OUTPUT);      pinMode(IN1_M2,OUTPUT);   pinMode(IN2_M2,OUTPUT); } void loop(){   if (myIrrecv.decode(&results)){                 switch(results.value){           case 0xFD00FF: //power           break;           case 0xFD807F://vol+             forward();           break;         ...

Wheel Encoders

 Wheels Encoders Code #define rightMotorFor 5 #define rightMotorRev 4 #define leftMotorFor 6 #define leftMotorRev 7 #define encoderPin 2 volatile long encoderValue = 0; void setup() {   Serial.begin(9600);   pinMode (rightMotorFor, OUTPUT);   pinMode (rightMotorRev, OUTPUT);   pinMode (leftMotorFor, OUTPUT);   pinMode (leftMotorRev, OUTPUT);   pinMode (encoderPin, INPUT_PULLUP);   attachInterrupt(digitalPinToInterrupt(encoderPin), AdvanceEncoderValue, RISING); } void loop() {   //make sure car is pointing forward   //right hand side of figure 8   for(int i =0; i< 4; i++){   rightTurn();   goForward();   }      //left hand side of the figure 8   for(int i =0; i< 4; i++){   leftTurn();   goForward();   }      //all done with the code   allStop();          } void goForward() {   encoderValue = 0;   digitalWrite(rightMotor...
Arduino Motor Control Car

 Arduino Motor Control Car Using L293H Bridge //This will run only one time. void steup () {     pinMode (3, OUTPUT);      pinMode (4, OUTPUT);      pinMode (5, OUTPUT);      Serial.begin (9600) } void loop() {     int reading = analogRead(A0);     Serial.println (reading);     int output = reading/100;     digitalWrite (3, HIGH);     digitalWrite (4, LOW);     digitalWrite (5, output);     delay (2000); }

temperature LCD and DHT11

 Code for  temperature LCD and DHT11 /*  * temperature LCD and DHT11.c  *  * Created: 7/16/2020 7:41:41 PM  * Author : Daniel F Diaz Bayona  */  #include <avr/io.h> #include <stdlib.h> #include <stdio.h> #include "LCD16x2_4bit.h" #define DHT11_PIN 8 uint8_t c=0,I_RH,D_RH,I_Temp,D_Temp,CheckSum; //here we will set the pin to low and high //first the pin will be low then after 200ms delay it will show or be high void Request() { DDRD |= (1<<DHT11_PIN); PORTD &= ~(1<<DHT11_PIN); _delay_ms(200); PORTD |= (1<<DHT11_PIN); } //the following function will show th response of the sensor DHT11 void Response() { DDRD &= ~(1<<DHT11_PIN); while(PIND & (1<<DHT11_PIN)); while((PIND & (1<<DHT11_PIN))==0); while(PIND & (1<<DHT11_PIN)); } //this function will receive the data, check for received bit 0 or 1 //if the pulse is greater than 30ms //then it ...

JugueBot Code for different parts of project

Servo Motor fo robotic Arm Test at 90 degrees #include <Servo.h> Servo myservo1; Servo myservo2; Servo myservo3; Servo myservo4; int pos1=90, pos2=90, pos3=90, pos4=90; void setup() {   // put your setup code here, to run once   Serial.begin(9600);   myservo1.attach(3);   myservo2.attach(5);   myservo3.attach(6);   myservo4.attach(9);   delay (5000);    } void loop() {   // put your main code here, to run repeatedly:   myservo1.write(pos1);   myservo2.write(pos2);   myservo3.write(pos3);   myservo4.write(pos4);   delay(2000); }         Code for direcction of the wheels          #define SPEED 140     #define TURN_SPEED 160     #define speedPinR 9   //  Front Wheel PWM pin connect Right MODEL-X ENA  #define RightMotorDirPin1  22    //Front Right Motor direction pin 1 to Right MODEL-X IN1...

2 BIT ADDER AND FULL ADDER

 2 BIT ADDER TRUTH TABLE Inputs OUTPUTS A0 B0 A1 B1 S2 S1 S0 1 0 0 0 0 0 0 0 2 0 0 0 1 0 1 0 3 0 0 1 0 0 1 0 4 0 0 1 1 1 0 0 5 0 1 0 0 0 0 1 6 0 1 0 1 0 1 1 7 0 1 1 0 0 1 1 8 0 1 1 1 1 0 1 9 1 0 0 0 0 0 1 ...